

How to Refinish Wood Furniture: A Guide for Central Florida Homes

Refinishing wood furniture really comes down to three core steps: stripping the old finish, sanding the wood smooth, and applying a new stain and protective topcoat. It’s a process that can completely revive tired, worn-out pieces and turn them into something custom and beautiful for your home.
Giving Your Cherished Furniture a Second Life
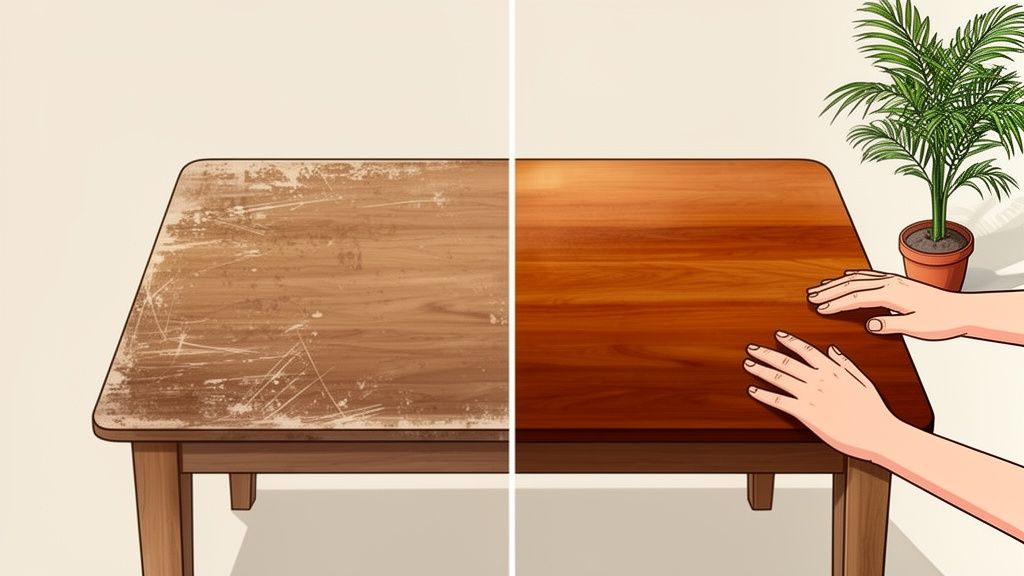
Think about that beautiful, solid wood dining table you inherited, or maybe a vintage dresser you scored at a local Orlando market. It’s got character, but it's definitely showing its age. Before you even think about replacing a high-quality piece, we want to talk about the magic of refinishing. We’ve seen firsthand how a little effort can completely transform furniture, and we’re here to walk you through how to refinish wood furniture like a pro.
This is more than just a weekend DIY project. It’s a chance to restore quality craftsmanship and perfectly tailor a piece to fit the style of your Central Florida home. Reviving a well-made item, like the durable Amish furniture we love, is a rewarding and sustainable choice that honors its history while giving it a fresh, modern life. It's a fantastic way to create a one-of-a-kind look without buying new.
Why Refinishing Is a Smart Choice
Choosing to refinish is an investment in both sustainability and long-term value. Instead of sending a sturdy piece to the landfill, you’re giving it a whole new chapter. This mindset is gaining traction all over the country, and we're seeing it right here in our community.
The U.S. Furniture Repair & Reupholstery industry is projected to hit $2.1 billion by 2025. This boom is driven by a growing desire to extend the life of cherished pieces. It highlights a real shift towards sustainability and quality, with pros noting that a proper refinishing job can boost a piece's value by 20-30%.
This movement really gets to the heart of what we at Slone Brothers have always believed in since 1980: the long-term value of well-built furniture. When you work with the beautiful wood you already own instead of against it, you preserve its legacy and create something that's uniquely yours. You can learn more about how small changes make a big impact in our guide to budget-friendly furniture refresh ideas.
Refinishing has become a go-to option for homeowners in Central Florida. In fact, off-site household restoration services now make up more than half of the industry's revenue. Families are choosing to extend the life of their furniture rather than just replacing it. You can dig into more insights about the rise of the furniture repair industry on ibisworld.com. This guide will give you the confidence you need to start your own transformation, one step at a time.
How to Refinish Wood Furniture: Assessing Your Piece and Gathering Tools
Before you even think about grabbing a sander or popping open a can of stain, the most important part of any refinishing project has to happen. It's just like our Design Team planning a room layout before moving a single sofa—you need a solid game plan. A great result always starts with a thorough assessment, so let’s walk through what to look for.
First things first, you need to figure out exactly what you're working with. Is it solid wood, or is it a more delicate veneer? An easy way to tell is to look at the edges of a tabletop or the front of a drawer. If you can see the end grains (those little circular or wavy patterns in the wood), you’re most likely looking at solid wood. If you see a perfectly straight, uniform edge that looks different from the top surface, you’re probably dealing with veneer. This is a critical distinction because you can sand right through a thin veneer if you're too aggressive. To get a better handle on the materials you might be working with, check out our guide on choosing the right hardwood for longevity and style.
What Is The Condition of Your Furniture?
Next up, give the piece a close inspection. Look at the current finish and the overall condition of the wood itself. Are there deep scratches, gouges, or ugly water rings? Is the existing finish peeling away, or is it just looking a little tired and faded from the Florida sun? Minor surface issues can often be sanded out, but deeper damage might need a bit of wood filler and extra attention.
This isn’t just a quick glance; it’s a crucial step in a process that more and more homeowners are embracing. The Furniture Repair Service market was valued at a staggering $2.1 billion in 2023 and is expected to more than double by 2031. It’s clear that people are choosing to restore rather than replace—especially since minor issues like scratches and faded finishes affect over 60% of wood furniture after just a few years of regular use. If you’re curious about the trend, you can review the market research from verifiedmarketresearch.com.
Once you know the material and its condition, you can finally decide on the scope of your project. A simple refresh might just call for a light scuff-sanding and a new topcoat, but a full-blown restoration will mean stripping that old finish completely off.
To help you get a clear picture, we've put together a simple checklist. Use this to systematically evaluate your piece and decide what you're up against.
Wood Condition Assessment Checklist
| Check For | What It Means | Recommended Action |
|---|---|---|
| Solid Wood vs. Veneer | Solid wood is forgiving; veneer is thin and delicate. | Check edges for end grain (solid) or a seam line (veneer). Be gentle with veneer. |
| Surface Scratches | Minor cosmetic wear that hasn't penetrated the wood. | Light sanding (220-grit) will likely remove them. |
| Deep Gouges or Dents | Damage that has broken the wood fibers. | Requires wood filler or epoxy before sanding and staining. |
| Water Rings/Stains | Moisture has gotten trapped in the finish (white rings) or wood (dark rings). | Try mineral spirits for white rings; dark rings may require sanding or bleaching. |
| Peeling/Flaking Finish | The old topcoat is failing and lifting off the wood. | The finish must be completely stripped off before proceeding. |
| Wobbly Joints/Legs | Structural instability, usually from glue failure. | Disassemble, clean old glue, and re-glue joints with wood glue and clamps. |
Walking through these points will give you a realistic idea of the time and effort your project will take, helping you avoid any surprises down the road.
Your Essential Toolkit for a Florida Refinishing Project
Getting all your supplies together before you start is one of the best things you can do to save time and avoid frustration. Here in Central Florida, our garages can get pretty humid, so choosing the right products is essential for a good result. Here’s a checklist of what you'll need to get started.
Essential Supplies Checklist:
- Safety First: Always put your health first. You’ll absolutely need chemical-resistant gloves, safety goggles to protect your eyes, and a high-quality respirator or mask. This is especially true when working with chemical strippers or creating fine sanding dust.
- Cleaning Crew: You have to start with a clean surface. A simple mix of gentle soap (like Murphy Oil Soap) and water or a dedicated wood cleaner works great to cut through years of grime.
- Stripping Agents: If you're removing a thick, stubborn old finish, a chemical stripper is your best friend. In our humid climate, a gel-based stripper works best because it evaporates more slowly, giving it more time to dissolve the finish.
- Sanding Supplies: This is where the real transformation happens. Get a variety of sandpaper grits (like 120-grit for initial sanding and 220-grit for that final smooth touch). A sanding block is a must for flat surfaces, and flexible sanding sponges are perfect for curves and details. An orbital sander is a huge time-saver for big, flat areas like tabletops.
- Application Tools: Grab a set of natural-bristle brushes for oil-based finishes and synthetic brushes for water-based products. You'll also want a big supply of clean, lint-free rags or shop towels for applying stain and wiping away the excess.
Pro Tip from Slone Brothers: Before you begin, take a few photos of your furniture from all angles. It not only helps you remember how everything goes back together but also gives you an awesome "before and after" to show off when you're done!
Stripping and Sanding for a Flawless Canvas
So, you’ve checked out your piece and have your tools ready to go. Now comes the most transformative part of the whole project: stripping off that old finish to reveal the beautiful wood underneath. This is definitely where the real work begins, but it’s also incredibly rewarding to see that raw grain emerge from under years of wear and tear. A perfectly prepped, flawless canvas is the secret to getting a professional-looking result every time.
You've really got two main ways to tackle this: chemical stripping or sanding. The best choice boils down to the piece of furniture itself—its shape, the kind of finish you're up against, and whether you're working with solid wood or a delicate veneer.
This simple flowchart lays out the opening moves for any successful furniture project. It’s all about having a clear plan before you start.
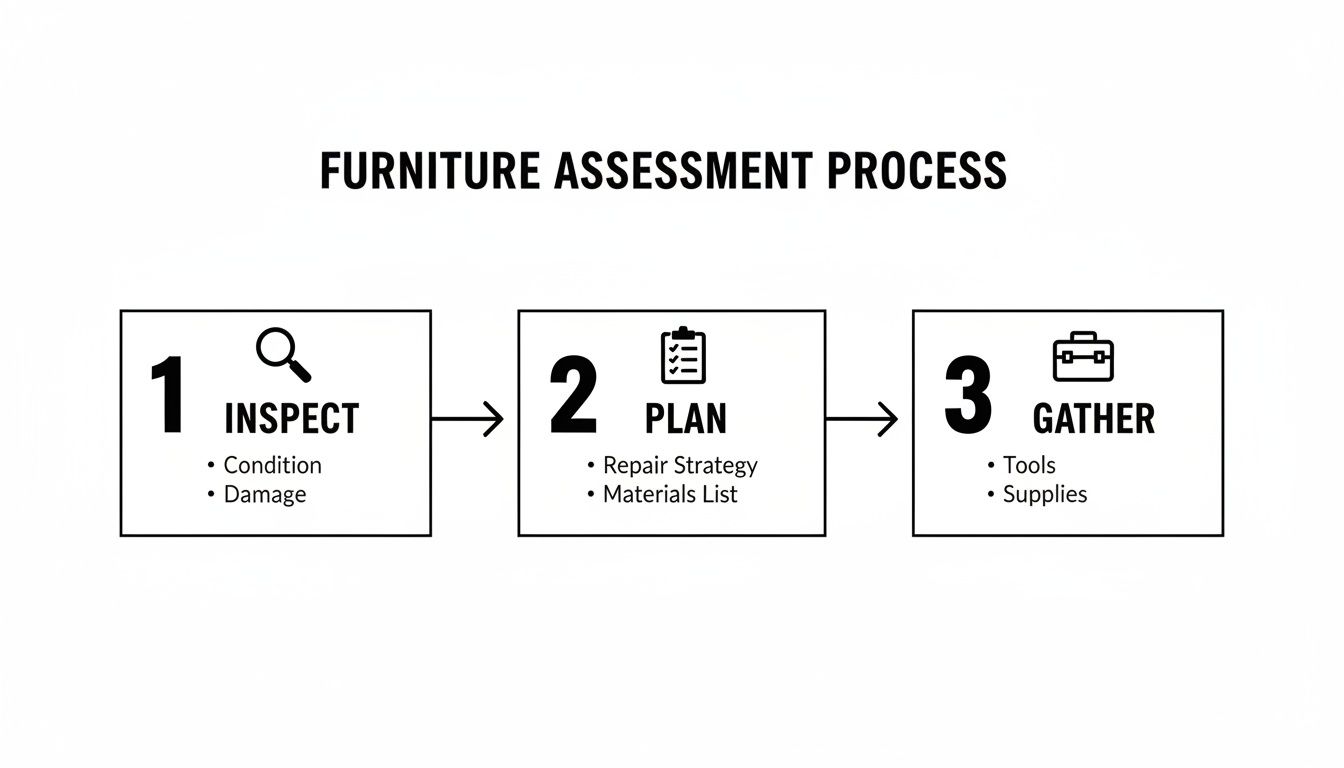
This visual is a great reminder to be methodical. Figure out your strategy and get your tools in order before you make any permanent changes to the piece.
Chemical Stripping for Intricate Details
For any furniture with fancy carvings, turned legs, or ornate trim, chemical stripping is usually the way to go. Sandpaper just can't get into all those little nooks and crannies, but a good stripper will do the heavy lifting for you. Working in a space with great airflow, like an open garage here in Longwood, is absolutely non-negotiable when using these products.
When to Use a Chemical Stripper:
- Complex Surfaces: It's a lifesaver for decorative molding, spindles, and detailed chair backs where sanding would be a total nightmare.
- Thick Finishes: Perfect for cutting through multiple layers of old paint or a heavy varnish that would clog up sandpaper in seconds.
- Veneered Pieces: Using a stripper is often much safer for veneers than aggressive sanding, which can easily burn right through that thin top layer of wood.
To get started, brush on a thick, even coat of stripper using a natural-bristle brush and let it do its thing according to the manufacturer's directions. You’ll start to see the old finish bubble up and lift off the surface. Once it’s ready, grab a plastic scraper or putty knife and gently push off the softened gunk. For the detailed spots, an old toothbrush or a brass-bristle brush works wonders to scrub out the residue. To get the best results, it’s a good idea to understand how to remove paint from wood like a pro before you jump in.
Sanding Down to Bare Wood
When you’re dealing with big, flat surfaces—think tabletops, dresser sides, or drawer fronts—sanding is an incredibly effective way to get rid of the old finish. It gives you a ton of control and gets the wood ready for staining all in one go. An orbital sander is your best friend here; it will save you hours of elbow grease.
Kick things off with a medium-grit sandpaper, like 100 or 120-grit, to power through that old finish. Move the sander in steady, even passes, and always, always follow the direction of the wood grain. If you go against the grain, you'll create deep scratches that are a real pain to remove later on.
Our Local Tip: Here in Central Florida, the humidity can make old finishes get gummy and sticky as you sand. Make sure to clean your sandpaper often to keep it from clogging up. A clogged pad doesn’t work well and can even damage the wood.
Once the old finish is gone, you’re not done yet. The next step is to smooth out the raw wood so it’s ready for the new stain. Honestly, this is probably the most critical part of getting that pro-level look.
The Art of a Perfectly Sanded Surface
After stripping or the initial sanding, it's time to refine the surface. The goal is to create a silky-smooth canvas that will soak up stain evenly and beautifully. This just means working your way through progressively finer grits of sandpaper.
- Transition to a Finer Grit: After the 120-grit paper has done the heavy lifting, switch over to 150-grit to erase any scratches left behind. Go over the entire piece again, still moving with the grain.
- The Final Polish: The last sanding pass should be with 220-grit sandpaper. This super-fine grit closes up the wood pores and gives the surface a smooth, polished feel that’s perfect for stain. Don't even think about skipping this step! It’s what separates a good finish from a great one.
- Clean the Surface: When you're done sanding, your piece will be covered in fine dust. Use a vacuum with a brush attachment to get most of it, then wipe everything down with a tack cloth or a lint-free rag lightly dampened with mineral spirits to pick up any lingering particles.
This careful prep work is a huge part of proper furniture upkeep, just like the seasonal checks we always recommend. For more advice on keeping your furniture in great shape all year, our fall furniture maintenance checklist has some helpful tips. A well-prepped surface guarantees your new finish will look fantastic and last for years.
Choosing and Applying the Perfect Finish
Now for the best part. With all the hard prep work behind you, you’re left with a perfectly smooth, raw wood canvas. This is where you get to bring your vision to life, choosing and applying a finish that gives your furniture the look and protection it needs to thrive in your Central Florida home. The right finish doesn’t just define the style—it’s a crucial barrier against our notorious humidity and sun.
This stage is all about making it yours. It’s a lot like our Custom-Order program at Slone Brothers, which lets you pick the exact look you want for a new piece. Now, you get to do the same for your refinished treasure.
Selecting Your Ideal Finish
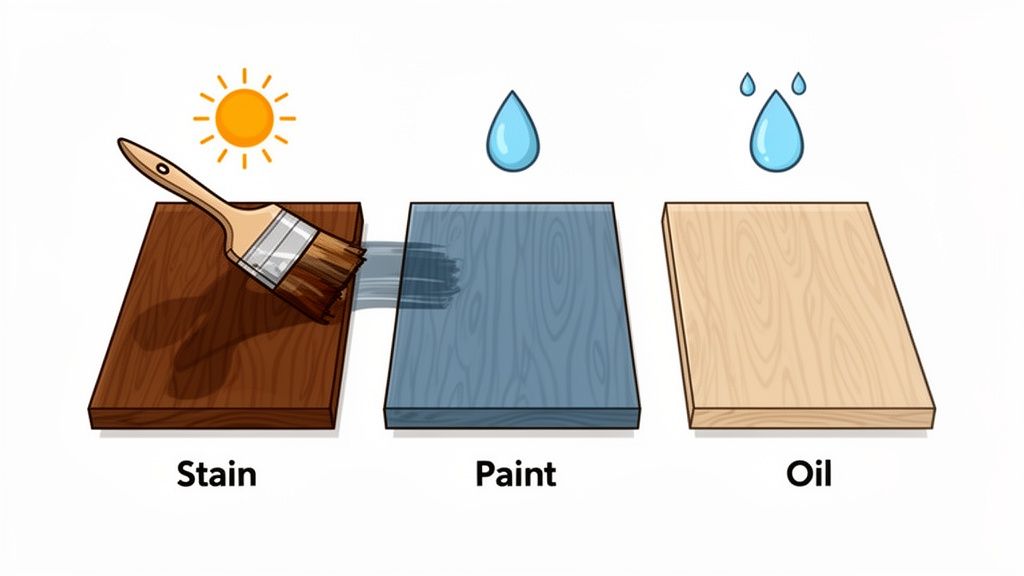
When it comes to wood furniture, the three most popular routes are stain, paint, and natural oils. Each one offers a distinct aesthetic and a different level of protection, so the best choice really comes down to the look you’re after and how you plan to use the piece.
Here’s a quick rundown:
- Wood Stain: This is your go-to for highlighting the natural beauty of the wood grain. Stains soak into the wood fibers, adding color without covering up that gorgeous texture. An oil-based stain can create a deep, rich look perfect for a classic American-made dining table, while water-based options are a bit easier to clean up.
- Paint: Want a complete transformation? Paint offers endless color possibilities. It sits on top of the wood, providing a durable, solid finish. It's an excellent choice for modernizing a dated bedroom set or hiding imperfections that a stain would only make more obvious.
- Natural Oils (Like Tung or Linseed): These finishes penetrate deep into the wood to protect it from the inside out. They create a warm, low-sheen look that feels incredibly natural to the touch. An oil finish is great for pieces where you want to feel the wood's texture, but keep in mind it offers less protection against scratches and spills than a hard topcoat like polyurethane.
A quality finish is everything in the U.S. wooden furniture manufacturing industry, which is an $82 billion business. Just applying stain can give you more than 20 aesthetic variations, and thankfully, modern techniques can cut sanding time by 40%, making DIY projects much more manageable.
Finish Type Comparison for Florida Homes
To make your decision easier, we've put together a quick comparison table. This breaks down the most common wood finishes to help you choose the best one for your project's style and durability needs, especially with our Florida climate in mind.
| Finish Type | Best For | Durability Level | Application Tips |
|---|---|---|---|
| Oil-Based Stain | Highlighting natural wood grain with deep, rich color. | Moderate | Use a pre-stain conditioner on soft woods. Wipe off all excess stain thoroughly. |
| Water-Based Stain | Achieving a wide range of colors with easy cleanup. | Moderate | Dries quickly, so work in smaller sections to avoid lap marks. |
| Latex/Acrylic Paint | A complete color change, modernizing old pieces, or hiding flaws. | High | Apply a quality primer first. Use multiple thin coats for a smooth finish. |
| Natural Oil Finish | Creating a natural, hand-rubbed look that showcases wood texture. | Low to Moderate | Requires periodic reapplication. Best for low-traffic decorative items. |
Choosing the right finish sets the stage for a piece that will not only look fantastic but will also hold up well over time.
Application Techniques for a Professional Look
How you apply your chosen finish is just as important as the product itself. Patience and the right technique are what stand between you and common frustrations like blotches, drips, and ugly brush strokes.
A blotchy stain job is a classic DIY headache, especially on porous woods like pine. The secret weapon here is a pre-stain wood conditioner. This product lightly seals the wood so it absorbs the stain uniformly. Just apply it with a rag, let it penetrate for about 15 minutes, wipe off the excess, and then get your stain on while the wood is still damp from the conditioner.
When you're ready to stain, use a clean, lint-free rag. Wipe it on generously in the direction of the grain, let it sit for a few minutes to soak in, and then—this is the important part—use another clean rag to wipe off all the excess. The final color is determined by what’s left after you wipe, not by how much you slather on.
Our Design Team's Tip: For a deeper, richer color, you can apply a second coat of stain after the first has dried completely. Just be sure to wipe away all the excess stain from each coat. Leaving a thick layer on the surface will result in a sticky, uneven mess that never fully dries.
For a flawless paint finish, thin coats are your best friend. Use a high-quality synthetic brush and apply the paint in long, smooth strokes, always keeping a "wet edge" to prevent lap marks. If you’re breaking out an airless sprayer for that truly professional look, your success hinges on the gear. Getting the right spray tip is crucial, and you can find some great guidance on choosing the right tip size for airless sprayer finishes.
Applying a Protective Topcoat
No refinishing project is truly finished without a protective topcoat. This clear layer is what shields all your hard work from scratches, moisture, and the chaos of daily life. For durability, polyurethane is the undisputed champion, especially for high-use items like tables and desks.
Here's how to get a durable, glass-smooth polyurethane finish:
- Stir, Don't Shake: Gently stir the polyurethane. Shaking it creates air bubbles that will mess up your smooth finish.
- Apply a Thin Coat: Use a natural-bristle brush for oil-based poly or a synthetic brush for water-based. Apply a thin, even coat, always moving with the wood grain.
- Sand Between Coats: Once the first coat is completely dry (check the can for the specific timing), lightly sand the entire surface by hand with 220-grit sandpaper. This just scuffs up the surface enough for the next coat to grab on to.
- Clean and Repeat: Wipe away every speck of sanding dust with a tack cloth or a rag dampened with mineral spirits. Then, apply your next coat. For surfaces that will see a lot of action, we recommend at least three coats.
Properly sealing your piece is the best defense you have against damage. For even more in-depth advice, check out our ultimate guide to protecting wood furniture from scratches and stains.
When to DIY and When to Call the Experts
There’s a special kind of pride that comes from taking an old, tired piece of furniture and giving it a brand-new life with your own two hands. It’s an incredibly rewarding experience. But as your local furniture authority here in Longwood since 1980, we also believe in giving honest advice. And the truth is, not every piece is a good candidate for a weekend DIY project.
Knowing when to roll up your sleeves and when to step back and call in a professional is a critical skill. Making the wrong call can, in some cases, lead to irreversible damage to a valuable or sentimental piece. It’s all about honestly assessing the scope of the project and your own comfort level before you even pick up the sandpaper.
Red Flags That Signal You Need a Pro
Some issues go far beyond surface-level scratches or a faded finish. If you spot any of the following problems with your furniture, it's a strong sign that a professional touch is needed to get the job done right and ensure the piece’s longevity.
- Extensive Veneer Damage: If you’re seeing large areas where the thin wood veneer is chipping, peeling, or bubbling, this is not a simple fix. Professionals have specialized tools and adhesives to repair or replace veneer without harming the underlying wood—a delicate task that’s very tricky for a beginner.
- Major Structural Repairs: Are the legs wobbly beyond what a simple tightening of a screw can fix? Do you see deep cracks in the frame or broken joints? Complex structural problems require real woodworking know-how to properly disassemble, repair, and re-glue the piece so it’s stable and safe to use again.
- Antique or High-Value Pieces: If you’re dealing with a genuine antique or a piece with significant monetary value, it’s almost always best to consult an expert. A professional restorer understands how to preserve the piece’s patina and historical integrity, which is crucial for maintaining its value. A well-intentioned DIY job can sometimes tank the value of an antique.
The Sentimental Value Factor
Sometimes, the decision isn't about complexity, it's about heart. Think about that cherished rocking chair from your grandmother or the dining table that’s been the center of every family holiday for decades. These pieces are more than just furniture; they're family heirlooms.
When a piece is irreplaceable on a sentimental level, the risk of making a mistake can be too great. If the thought of a slip of the sander or an uneven stain job on such a treasured item makes you anxious, that’s your sign to seek professional help. A pro in the Greater Orlando area can give you peace of mind and a flawless result.
This is especially true for intricate American-made furniture, where the beauty lies in the flawless joinery and finish. Preserving that level of quality often requires a seasoned hand.
When We Can Help at Slone Brothers
We get it. We understand the passion behind wanting to restore a beautiful piece of furniture. At Slone Brothers Furniture, our commitment to quality craftsmanship extends beyond our showroom floor. While we don't offer refinishing services ourselves, our In-House Design Team is a fantastic resource for our Central Florida community.
If you're on the fence about a project, bring us some photos! Our experts can offer their professional opinion, help you assess the condition of your piece, and provide honest advice on whether it’s a manageable DIY task. We can also connect you with trusted, reputable refinishing professionals here in the local Orlando area who we know do exceptional work. Making a smart decision from the start is the best way to honor your beautiful furniture.
Common Questions About Refinishing Furniture
As the go-to furniture experts here in Longwood, we field a lot of questions from our neighbors about refinishing wood furniture. It’s a fantastic way to give an old piece a new lease on life, but it's totally natural to have some questions before you dive in.
Here are a few of the most common ones we hear right in our showroom.
How Long Does a Refinishing Project Take?
This is probably the number one question we get, and the honest answer is: it really depends! The total time commitment hinges on the furniture's size, its complexity, and the condition it's in to start with.
A small, simple end table might be a great weekend project, taking somewhere around 8-10 hours of active work. But a big or intricate piece, like a dining set with six chairs, could easily take 20-40 hours spread out over several weeks.
The most important thing to remember is allowing for plenty of drying time between your coats of stain and sealer—that's what really extends the timeline. Rushing this part is the quickest way to a disappointing result.
Can I Refinish Wood Veneer Furniture?
Yes, you absolutely can, but you have to be extremely careful. Veneer is just a very thin layer of real wood glued to a core material. It looks beautiful, but it lacks the forgiving thickness of solid wood.
The biggest danger is sanding right through it, which is easier to do than you'd think. Because of this, we always recommend using a chemical stripper to remove the old finish from veneer.
Once it's stripped, you should only sand by hand with very fine-grit sandpaper (220-grit or higher). The goal here is just to lightly scuff the surface for the new finish, not to actually remove any wood. An orbital sander is almost always too aggressive for this delicate job.
What Is the Most Durable Finish for a Kitchen Table?
For any high-traffic surface that sees daily action—like a kitchen or dining table—durability is everything. Here in Central Florida, that also means a finish that can stand up to spills, heat, and regular cleaning.
Hands down, an oil-based polyurethane topcoat offers the best protection. It cures into a hard, resilient plastic-like layer that effectively seals the wood from just about everything.
For maximum durability, we advise applying at least three thin coats. Just be sure to lightly sand with fine-grit sandpaper between each coat to make sure the next layer has something to grab onto. For more tips on keeping it looking great, our guide on how to care for wood furniture is a great resource.
How Should I Dispose of Old Chemicals?
Properly getting rid of leftover chemical strippers, stains, and solvents is crucial for both safety and protecting our local environment. These materials are considered household hazardous waste.
Important: These chemicals should never be poured down the drain or thrown in your regular trash.
Most local governments have specific guidelines for this. You’ll need to check with your municipality, like Seminole County or the City of Orlando, for their hazardous waste collection schedules and drop-off locations. Disposing of these chemicals the right way ensures they are handled safely and don't end up where they shouldn't.
Feeling inspired? Stop by our showroom and chat with our Design Team for a complimentary consultation. Ready to find the perfect piece for your home? Visit the Slone Brothers Furniture showroom in Longwood, FL, and let our design experts help you get started!